You are here:Home » News » How To Choose The Right AC Installation Kit for R32, R410A, And Split Air Conditioners
How To Choose The Right AC Installation Kit for R32, R410A, And Split Air Conditioners
Views: 0 Author: Site Editor Publish Time: 2026-10-03 Origin: Site
An AC installation kit may look complete, yet one mismatched pipe can stop the entire project. Refrigerant labels, copper sizes, route length, wiring, and drainage must all match the equipment.
R32 and R410A systems often use similar parts, but similarity never proves compatibility. The exact indoor and outdoor model combination decides what fits. DABUND has supplied HVAC&R parts since 2008, including insulated line sets and split AC installation accessories. This guide explains how to compare kits safely, avoid costly sizing mistakes, and prepare a reliable installation.
1. Start With the Air Conditioner, Not the Kit Label
The safest starting point is the installation manual for the exact matched system. Record both indoor and outdoor model numbers before shopping. Two units sharing the same capacity may require different refrigerant pipe sizes, electrical cables, or line-length limits.
The refrigerant name comes next. An R32 AC installation kit must use components permitted for the selected R32 system. An R410A AC installation kit needs the same model-level confirmation. Never mix R32 and R410A, and never use a kit label as permission to convert refrigerants.
Photograph the equipment nameplates before ordering. Keep the manual revision, connection schedule, and approved accessory list beside the quotation. These details prevent a generic R32-compatible copper pipe description from replacing an actual compatibility check.
R32 receives attention because its global warming potential is about one-third of R410A’s. However, it also requires refrigerant-specific safety procedures and trained handling. This R-32, The Most Balanced Refrigerant | Benefits of Daikin Technology explains its role and environmental profile.
Many current systems use comparable copper dimensions and flare geometry for R32 and R410A. That does not make every line set interchangeable. Pressure rating, wall thickness, pipe cleanliness, flare nuts, and approved installation practices still matter. An R32 and R410A installation manual also specifies suitable pipe cutters, flare tools, and tightening methods.
Use this order when checking compatibility:
Check
What to confirm
Exact equipment
Matched indoor and outdoor model numbers
Refrigerant
R32 or R410A shown on the nameplate
Pipe connection
Flared, brazed, or proprietary quick-connect design
Service requirements
Approved tools, leak testing, evacuation, and local safety rules
A “universal” split AC installation kit should therefore trigger more checking, not less. It may contain broadly useful accessories. It cannot override the equipment manufacturer’s pipe, wiring, and installation requirements.
This distinction matters during replacements. An existing R410A line set may look suitable for new equipment. Reuse still depends on size, condition, cleanliness, pressure suitability, joint preparation, and written manufacturer approval.
2. Match the Liquid Line and Suction Line Diameters
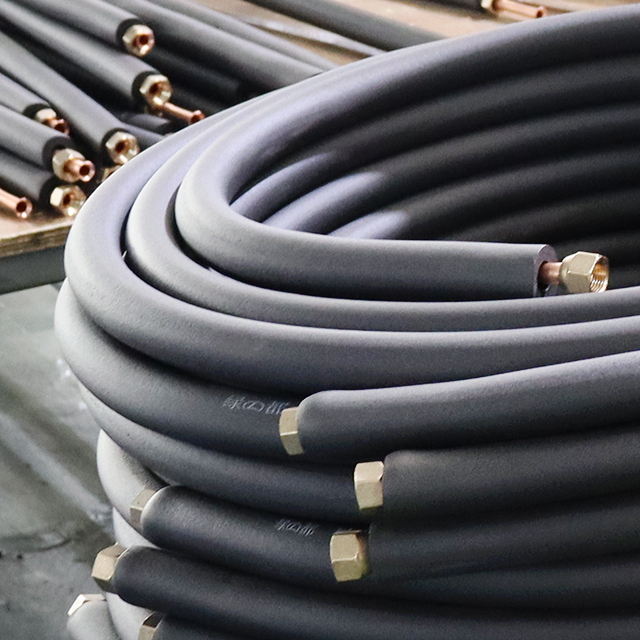
The pre-insulated copper line set is the most critical kit component. It contains a smaller liquid line and a larger suction, or gas, line. Both outside diameters must match the connection sizes listed for the exact air conditioner.
Common combinations include 1/4 × 3/8 inch, 1/4 × 1/2 inch, and 1/4 × 5/8 inch. Larger systems may use 3/8 × 5/8 inch or greater sizes. These pairings are useful shopping filters, but they are not universal BTU rules.
For example, many 9,000 or 12,000 BTU mini splits use 1/4 × 3/8 inch tubing. Some 12,000 BTU models instead require a 1/2-inch gas line. Capacity can narrow the search, while the manual makes the final decision.
Wrong pipe diameters can reduce refrigerant velocity or create excessive restriction. Either condition may hurt oil return, capacity, noise levels, and compressor life. Adapters do not automatically solve the underlying engineering mismatch.
Choose refrigeration-grade, dehydrated copper rather than general plumbing tubing. Look for ASTM B280 and C12200 specifications when they apply to the target market. The pipe should arrive clean, dry, capped, and protected from moisture or debris.
Factory pre-flared copper pipe can save installation time. Inspect every flare for smooth surfaces, even shape, and correct dimensions. Use the flare nuts supplied or approved by the equipment manufacturer. Tighten each joint using the manual’s torque value, not hand judgment.
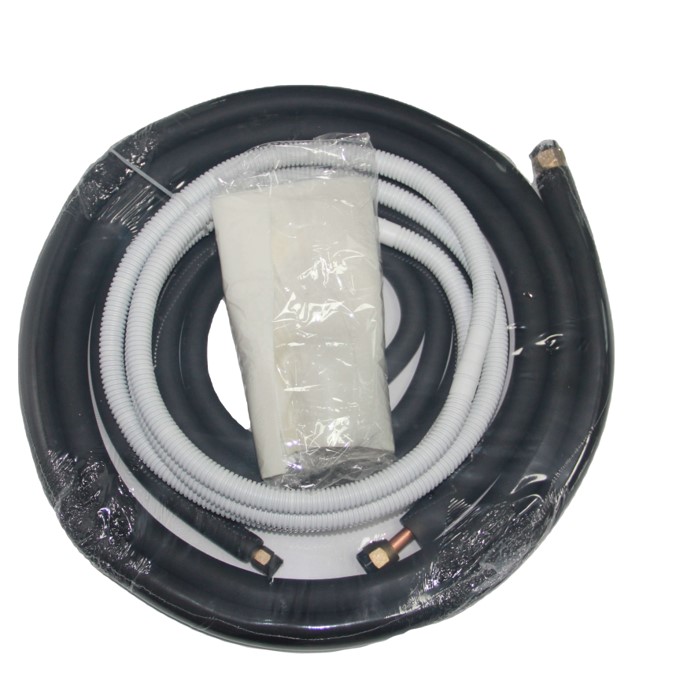
The Dabund Pipe includes 99.9% C12200 copper options meeting ASTM B280. Available pairings cover several common split-system sizes. Its product range also includes pre-flared ends, flare nuts, and white PE or black insulation options.
Before ordering, write both pipe sizes as a pair. A listing showing only one diameter is incomplete for a normal mini split line set.
Also confirm whether the quoted dimensions are outside diameters. Refrigeration tubing is normally specified this way, while other pipe industries may use different naming conventions.
3. Calculate Length, Vertical Lift, and Insulation Needs
Measure the real route between the indoor evaporator and outdoor condenser. Follow corners, wall penetrations, service loops, and vertical sections. Do not measure only the straight distance between units.
Then compare the result against three manual values: minimum line length, maximum line length, and maximum vertical lift. Some outdoor units include a factory charge covering a stated tubing length. Longer routes may need a precisely weighed additional refrigerant charge.
Choose a kit slightly longer than the planned route, but avoid large unused coils. Cutting a standard line set requires new flares and careful debris control. Coiling excess pipe may be permitted, although tight loops can trap oil, transmit vibration, or kink the copper. Follow the model instructions.
Route question
Buying decision
Is the measured route inside permitted limits?
Choose a compliant kit length
Does the route exceed the factory charge allowance?
Plan the specified additional charge
Is the vertical rise within limits?
Confirm oil return and capacity requirements
Will tubing remain outdoors?
Select UV-resistant insulation or add a protective cover
Insulation deserves equal attention. Split systems commonly require both refrigerant lines to remain continuously insulated. Closed-cell insulation reduces heat transfer and surface condensation. Seams, flare areas, and wall penetrations need careful sealing after testing.
Check insulation thickness, temperature range, water-vapor resistance, flame performance, and outdoor durability. Local codes may require particular smoke or flame ratings. Sunlight can damage exposed foam, so an exterior line set cover adds useful protection.
A product listing should state the usable line length, not merely the packaged coil size. It should also identify insulation thickness and exposure rating. When these details are missing, request a technical data sheet before approving the air conditioner installation pipe kit.
A longer kit is not automatically safer. Correct length protects performance, keeps the installation neat, and reduces unnecessary joints or field modifications.
4. Check Every Accessory Inside the Split AC Installation Kit
The word “complete” has no fixed industry definition. One mini split installation kit may contain only copper tubing. Another may add communication wire, drain hose, wall sleeve, tape, sealing putty, cable ties, and fasteners.
Compare the packing list line by line. The refrigerant line set should receive the closest inspection, followed by electrical and drainage components. Small accessories still affect safety, reliability, and finished appearance.
●Communication cable: Confirm conductor count, wire gauge, insulation rating, voltage, and local code approval. Never substitute a generic cable because its colors appear similar. Terminal numbering must match both units.
●Condensate drain hose: Check the connection diameter and total route length. It needs a continuous downward slope without lifted sections, dips, or submerged outlets. Add a condensate pump when gravity drainage is impossible.
●Wall sleeve and cover: Verify the sleeve diameter against the bundled pipes, cable, and drain hose. It protects them from rough masonry edges. The outer cover and sealant help block rain, insects, and air leakage.
●Insulation tape and sealing putty: Use them for finishing and weather sealing, not for repairing damaged line insulation. Refrigerant joints should remain accessible until pressure testing and leak checks are complete.
Many projects still need separately purchased items. Common examples include a condenser pad or wall bracket, disconnect box, electrical whip, circuit breaker, surge protection, line set cover, and condensate pump. Required tools are rarely included.
A standard kit may also be mistaken for a pre-charged or quick-connect kit. Most conventional copper line sets contain no refrigerant. They require correct flaring, pressure testing, evacuation, and commissioning. Only use pre-charged connections when the air conditioner was specifically designed for that system.
The best AC installation kit is therefore not the package containing the most pieces. It is the package whose listed parts match the equipment, route, electrical design, and local requirements.
5. Use a Final AC Installation Kit Buying Checklist
Before payment, compare the proposed kit against the equipment submittal and installation manual. Put each requirement beside the seller’s specification. Missing data should be clarified before the package reaches the jobsite.
Use this final checklist:
1. Confirm the exact indoor and outdoor model combination.
2. Match the R32 or R410A refrigerant designation.
3. Verify both liquid and suction line outside diameters.
4. Check copper grade, standard, wall thickness, and pressure rating.
5. Confirm flare type, nut dimensions, and factory preparation.
6. Measure route length, vertical lift, and permitted bends.
7. Check the factory-charge length and extra-charge instructions.
8. Verify insulation thickness, UV resistance, and code ratings.
9. Match communication wire gauge, conductor count, and approvals.
10. Confirm drain size, slope, wall sleeve, cover, and sealants.
11. List every mounting, electrical, drainage, and service item sold separately.
12. Confirm warranty conditions and qualified-installer requirements.
After selection, installation quality still determines the result. A technician should protect open pipe ends, make accurate flares, and use specified torque values. Sharp bends, crushed insulation, and debris inside the tubing can cause lasting problems.
Conventional systems also need an approved nitrogen pressure test and leak inspection. The line set must then be evacuated using a vacuum pump and micron gauge. Refrigerant valves should open only after the system meets the manufacturer’s commissioning procedure.
R32 needs particular care because its safety classification affects tools, ventilation, ignition control, charge limits, and local codes. R410A also requires trained refrigerant handling. Purchase decisions should include installation competence, not only component price.
For distributors, contractors, and equipment brands, DABUND supports OEM and ODM kit configurations. Pipe sizes, lengths, insulation, printing, and matched accessories can be specified for repeat projects. A documented bill of materials helps keep every AC installation kit consistent across orders.
Record the accepted specification under a project code. Future replacements and repeat purchases then follow the same verified configuration, rather than relying on package color or an old invoice description.
Conclusion
Choosing an AC installation kit starts with the exact equipment manual. Match refrigerant, pipe diameters, route limits, insulation, wiring, drainage, and connection design. Treat BTU charts and “universal” labels only as filters. A verified kit, installed and commissioned correctly, protects efficiency, reliability, and warranty coverage.
FAQs About AC Installation Kits
Q: Can the same AC installation kit work with R32 and R410A?
A: Sometimes, but only after every specification matches. Many models use similar copper sizes and flare geometry. However, pressure ratings, pipe dimensions, nuts, tools, safety procedures, and permitted lengths remain model-specific. Never mix refrigerants. Use the exact air conditioner manual as the final authority.
Q: What size copper line set does a split air conditioner need?
A: Check the liquid-line and suction-line sizes in the model’s installation manual. Common pairs include 1/4 × 3/8 inch, 1/4 × 1/2 inch, and 1/4 × 5/8 inch. BTU capacity offers a rough starting point, but identical capacities can use different gas-line diameters.
Q: Does an AC installation kit include refrigerant?
A: Most standard kits do not. They contain copper tubing and installation accessories. Refrigerant is usually stored in the outdoor unit for a stated line length. Pre-charged or quick-connect line sets are different products and must match a purpose-designed system.
Q: How long should a mini split installation kit be?
A: Measure the complete route, including bends, wall passages, and vertical sections. Choose a length within the manufacturer’s minimum, maximum, and lift limits. Also check the factory-charge allowance. Excessive unused tubing should not be tightly coiled or cut without proper tools and new flares.
Q: Which parts may need to be purchased separately?
A: Depending on the project, separate items may include a condenser pad, mounting bracket, disconnect box, electrical whip, breaker, surge protector, condensate pump, and exterior line set cover. Service tools usually remain separate. Always compare the packing list against the installation plan.

 English
 العربية
 Français
 Русский
 Español
 Português
 Deutsch
 italiano
 日本語
日本語 한국어
한국어 Nederlands
 Tiếng Việt
 ไทย
ไทย Polski
 Türkçe
 አማርኛ
አማርኛ ພາສາລາວ
 ភាសាខ្មែរ
 Bahasa Melayu
 ဗမာစာ
ဗမာစာ Filipino
 Bahasa Indonesia
 magyar
 Română
 Čeština
 қазақ
қазақ Српски
 हिन्दी
 فارسی
فارسی Slovenčina
 Slovenščina
 Norsk
Norsk Svenska
 українська
 Ελληνικά
 Հայերեն
 Latine
 Dansk
Dansk Shqip
Shqip বাংলা
বাংলা Hrvatski
 Afrikaans
 Gaeilge
 latviešu
 Беларуская мова
 Български
 Esperanto
 Basa Jawa
 Kinyarwanda
 Soomaali
 Cymraeg