You are here:Home » News » Air Conditioner Bracket Installation Guide: Anchors, Leveling, Anti-Vibration Pads, And Safety
Air Conditioner Bracket Installation Guide: Anchors, Leveling, Anti-Vibration Pads, And Safety
Views: 0 Author: Site Editor Publish Time: 2026-10-27 Origin: Site
An outdoor condenser may weigh less than expected, yet small mounting errors can create serious risks. Loose anchors, poor leveling, or missing isolation pads can cause noise, movement, and structural damage.
This guide explains safe air conditioner bracket installation from the first wall check through final inspection. You will learn how to select anchors, level the support, position anti-vibration pads, and avoid common mistakes.
Pre-Installation Checks: Unit, Bracket, Wall, and Clearances
Begin by reading the outdoor unit installation manual. Record its operating weight, base dimensions, foot spacing, required clearances, and approved mounting method. Never choose an air conditioner bracket from BTU capacity alone. Two condensers of similar capacity can have different cabinet sizes and weights.
The bracket’s rated load must exceed the complete operating load. It also needs reserve capacity for vibration, wind, snow, ice, and maintenance forces. Do not treat a high load rating as proof that every wall can support it. The wall, anchors, bracket, bolts, and condenser feet form one load path. Its weakest part controls the installation.
Check these items before drilling:
●Bracket fit: Confirm arm length, crossbar width, condenser foot spacing, and bolt-hole alignment. The unit should sit fully on both arms without unstable overhang.
●Wall condition: Look for cracks, loose mortar, water damage, rot, corrosion, thin cladding, or hidden utilities. A finished surface may hide a weak structure.
●Working space: Preserve the manufacturer’s airflow, service, piping, and electrical clearances. Keep hot discharge air away from walls and nearby condensers.
●Environmental exposure: Consider salt air, heavy rain, freezing water, roof runoff, drifting snow, falling ice, and strong winds.
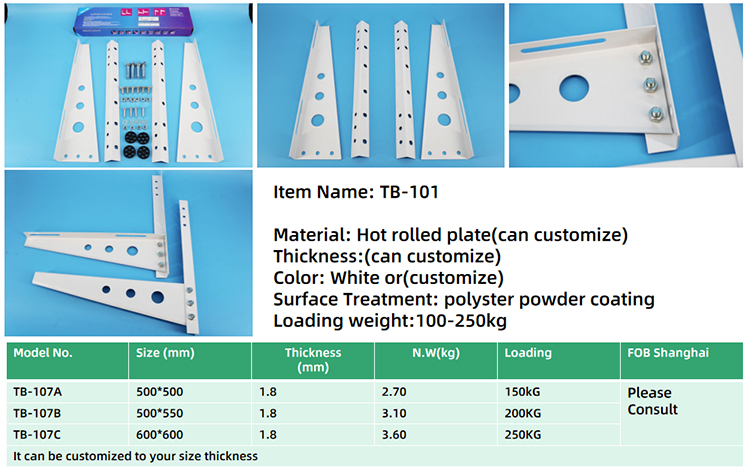
DABUND air conditioner brackets use hot-rolled steel and weather-resistant finishes. Applicable models support many 9,000–36,000 BTU mini split systems and loads up to 250 kg. Always confirm the chosen model’s drawing and rating before installation.
A wall bracket can protect the condenser from soil, debris, and shallow flooding. However, wall mounting may transfer compressor vibration into lightweight rooms. If the wall is flexible or beside a quiet bedroom, a ground stand could provide better acoustic separation.
Plan safe access before work begins. Use fall protection and lifting controls suited to the height and site. Keep the work zone clear below the bracket, and never leave a partly fastened assembly unattended.
Choosing Anchors for Concrete, Masonry, and Framed Walls
Anchors must match the structural substrate, not the visible finish. Siding, stucco, insulation, plaster, and brick veneer usually are not primary supports. Locate the concrete, structural masonry, studs, or engineered framing behind them. If the wall assembly is unknown, stop and ask a qualified contractor or engineer to assess it.
Structural substrate
Typical fastening approach
Essential checks
Sound concrete
Approved expansion or adhesive anchors
Edge distance, embedment, hole diameter, dust removal, and concrete condition
Solid masonry
Masonry-rated anchors placed in sound units
Unit strength, spacing, embedment, and distance from joints or edges
Hollow block
Approved anchors or engineered through-bolts
Cell location, face-shell capacity, internal obstacles, and pullout rating
Wood framing
Structural lag screws or bolts into studs/blocking
Stud location, sound wood, screw diameter, penetration, and washer size
Steel framing
Engineered bolts or structural attachment
Steel thickness, corrosion isolation, access, and approved connection detail
Do not select a universal anchor size from an online article. Required capacity depends on bracket geometry, unit weight, wall strength, anchor spacing, and environmental loads. Follow the bracket instructions, anchor manufacturer’s data, equipment manual, and local code. Coastal and high-wind locations may require project-specific engineering.
Drilled holes must match the anchor specification. Oversized or angled holes reduce holding strength. Concrete and masonry holes also require proper cleaning, especially before adhesive anchors. Use a depth stop, protect concealed pipes and cables, and keep holes away from damaged edges.
Each anchor should clamp the bracket firmly without crushing spacers or deforming thin metal. Tighten anchors to their specified torque using a calibrated tool when required. Do not substitute drywall plugs, small wood screws, or mixed leftover fasteners. They are unsuitable for a vibrating outdoor condenser.
The installation guidance stresses a supporting base strong enough for the unit’s weight. It also warns that improper installation can cause falling, vibration, noise, electrical hazards, or fire. Qualified installation is the safest choice whenever structural or electrical conditions are uncertain.
Marking, Drilling, and Leveling the Air Conditioner Bracket
Use the actual bracket or its verified template for layout. Mark the required height while preserving snow, flood, service, and airflow clearances. Then find structural attachment points. A stud finder can help, but exploratory verification or construction drawings may still be necessary.
Follow this installation sequence:
1. Establish a reference line. Mark a horizontal line using a spirit level or laser. Check the tool on a second surface if accuracy is uncertain.
2. Position the crossbar or uprights. Align every mounting hole over approved structural points. Mark holes precisely and recheck dimensions.
3. Scan before drilling. Confirm that electrical cables, water pipes, drains, and refrigerant lines are not behind the holes.
4. Drill correctly. Hold the drill square to the wall. Use the anchor maker’s bit diameter and required hole depth.
5. Install and tighten anchors. Seat the bracket against suitable structural spacers. Tighten in stages, following the specified pattern and torque.
6. Attach support arms. Fit locking bolts, washers, and braces exactly as shown in the bracket instructions.
Check level across the crossbar and along both support arms. Measure diagonals if the design allows; equal diagonals help confirm a square assembly. Both arms should share the load. A twisted bracket can leave one condenser foot partly unsupported.
Do not create an improvised slope for drainage unless the outdoor unit manufacturer specifically requires it. The condenser cabinet normally needs a stable, level mounting plane. Drain water must leave through the designed base-pan openings or drain connection. Incorrect tilting may increase vibration or cause water to collect where it should not.
After initial tightening, push each arm downward and sideways by hand before lifting the condenser. Any rocking, wall movement, anchor rotation, or metal distortion requires correction. Never test a questionable bracket by placing the expensive outdoor unit on it.
Installing Anti-Vibration Pads and Securing the Condenser
Anti-vibration pads sit between the condenser feet and bracket arms. They interrupt the rigid path carrying compressor and fan vibration into the wall. Proper pads can reduce humming indoors, protect painted surfaces, and limit fastener movement during normal operation.
Choose pads rated for outdoor HVAC equipment, expected temperature, oil exposure, and the load per foot. Pads should have equal thickness and sufficient area. Soft household rubber may compress unevenly, crack outdoors, or allow excessive movement.
Use this placement method:
●Clean both support arms and remove sharp debris.
●Place one matched pad beneath each approved mounting foot.
●Align pad holes, condenser feet, and bracket slots without forcing them.
●Install compatible bolts, flat washers, and locking hardware.
●Tighten evenly until secure, without crushing the isolators flat.
DABUND includes vibration-isolation pads and necessary hardware on applicable bracket packages. Its air conditioner support bracket range is intended for HVAC purchasing programs needing coordinated mounting components. Installers should still compare every supplied fastener and pad against the wall type and condenser manual.
Pads cannot repair loose anchors, a flexible wall, misaligned feet, or an undersized bracket. If vibration remains, check fan balance, refrigerant piping contact, cabinet panels, and line-set clamps. Copper tubing should not press rigidly against the wall or bracket. A short, tight line set can also carry vibration indoors.
Leave slight, manufacturer-approved flexibility in connected services. Drain hoses need a reliable route, while wiring and tubing need protection from sharp bracket edges. Do not use the refrigerant lines to pull the condenser into alignment.
Lift the condenser using enough trained people or rated lifting equipment. Keep hands away from pinch points. Do not lift by valves, piping connections, fan guards, or sheet-metal panels. Once positioned, secure every designated foot and confirm that service valves remain accessible.
Final Safety Inspection and Common Installation Mistakes
Inspect the complete assembly before electrical startup. Confirm that all anchors are fully seated, bracket joints are locked, support arms remain level, and every condenser foot rests on its pad. Verify fastener torque where specifications provide a value. Marking torqued fasteners can simplify the final visual check.
The final inspection should cover four areas:
Inspection area
What to verify
Structure
No cracking, rocking, bent steel, loose anchors, weak spacers, or unsupported cladding
Equipment
Correct clearances, stable feet, secured bolts, open drain paths, and accessible valves
Services
Protected wiring, grounded equipment, insulated refrigerant lines, and strain-free connections
Environment
Wind restraint, corrosion protection, snow clearance, roof runoff control, and safe service access
Common failures include anchoring only into veneer, using every bracket hole except the structural ones, and tightening against compressible siding. Other mistakes include uneven arms, missing washers, crushed vibration pads, blocked airflow, and unprotected cut edges. Touch up damaged coatings using a compatible corrosion-resistant system.
Outdoor unit installation also involves electrical work and pressurized refrigerant. These tasks can create shock, fire, frostbite, and environmental hazards. They generally belong to trained, licensed technicians. The U.S. Department of Energy heat-pump guidance recognizes pads, raised stands, and wall brackets as possible outdoor-unit supports. The correct choice remains site-specific.
Run the system only after completing the manufacturer’s commissioning steps. Listen for rattling and structure-borne humming during compressor ramp-up. Watch for bracket movement and confirm unobstructed drainage. Reinspect the installation after its first heating and cooling cycles, then include anchors, corrosion, pads, and fasteners in routine maintenance.
For contractors and distributors, DABUND can support coordinated purchasing of brackets, line sets, covers, and related HVAC accessories. Product coordination helps, but the installer remains responsible for site assessment, code compliance, and final mounting safety.
Conclusion
A safe air conditioner bracket installation depends on the entire load path. Match the bracket to the condenser, attach it to verified structure, level both arms, and use proper isolation pads.
Finish by checking clearances, drainage, corrosion protection, and every fastener. When wall strength or local requirements are uncertain, use a qualified HVAC contractor and structural professional.
FAQs About Air Conditioner Bracket Installation
Q: What anchors should I use for an air conditioner bracket?
A: Use anchors approved for the substrate and load. Follow product data and code.
Q: Must an outdoor AC unit be perfectly level?
A: Follow its manual. Most condensers need a level mounting plane.
Q: Where do anti-vibration pads go?
A: Place matched pads between each condenser foot and bracket arm.
Q: Can I attach the bracket to brick veneer or siding?
A: Usually not. Fasteners must reach verified framing, concrete, or structural masonry.
Q: How often should the bracket be inspected?
A: Check it after startup and during maintenance. Inspect anchors, corrosion, pads, bolts, and movement.

 English
 العربية
 Français
 Русский
 Español
 Português
 Deutsch
 italiano
 日本語
 한국어
 Nederlands
 Tiếng Việt
 ไทย
 Polski
 Türkçe
 አማርኛ
 ພາສາລາວ
 ភាសាខ្មែរ
 Bahasa Melayu
 ဗမာစာ
 Filipino
 Bahasa Indonesia
 magyar
 Română
 Čeština
 қазақ
 Српски
 हिन्दी
 فارسی
 Slovenčina
 Slovenščina
 Norsk
 Svenska
 українська
 Ελληνικά
 Հայերեն
 Latine
 Dansk
 Shqip
 বাংলা
 Hrvatski
 Afrikaans
 Gaeilge
 latviešu
 Беларуская мова
 Български
 Esperanto
 Basa Jawa
 Kinyarwanda
 Soomaali
 Cymraeg